Image New Scavenger Battery Boxes are ready. Check them out in our file section .

Scavenger Aluminum Astromech Legs Rev 2.0

You can find our official files & tutorials here. Please keep any discussions in the flatpack discussion thread.
Locked
User avatar
Marc ph
Owner
Owner
Posts: 95
Joined: Wed May 28, 2025 3:10 am
Answers: 0
Location: 77338

Scavenger Aluminum Astromech Legs Rev 2.0

Post by Marc ph »

Scavenger Aluminum Astromech Legs Rev 2.0

Image


Difficulty Level: Intermediate 2️⃣


Note: Rev 2.0 has the coupler lock these have been included to prevent the couples from spinning when removing the ankle.
Image

Assembly Guide Build OF Materials

DFX Files if you want to order from your own waterjet place
This is for one leg you will need to select quantity 2 when ordering from waterjet place


File 1 of 1
5052 H32 Aluminum (.187")
44.206 x 23.037 in
3_16_scavlegs_v2.dxf
3_16_scavlegs_v2.1.dxf
(435.48 KiB) Downloaded 91 times


Parts List

Material List (Buy a few extra we use similar parts for other kits)
Quantity 12 https://www.mcmaster.com/91263A889
Quantity 12 https://www.mcmaster.com/90592A016
Quantity 26 https://www.mcmaster.com/90009A221
Quantity 26 https://www.mcmaster.com/91263A837
Quantity 26 https://www.mcmaster.com/91263A841
Quantity 8 https://www.mcmaster.com/90078A210 used as spacer probably cheaper options but looks cool.
Quantity 8 https://www.mcmaster.com/90585A537
Quantity 8 https://www.mcmaster.com/90264A435
Quantity 8 https://www.mcmaster.com/92125A242
Quantity 8 https://www.mcmaster.com/94645A205


Do not Powder coat these legs the heat will remove the adhesive and you will see lines.


Cutting the groove in the leg is simple if you have this tool.

Image Scavenger WorkshopImage
User avatar
Marc ph
Owner
Owner
Posts: 95
Joined: Wed May 28, 2025 3:10 am
Answers: 0
Location: 77338

Re: Scavenger Aluminum Astromech Legs

Post by Marc ph »

Prep Work

Before you start you will need the tools pictured below.
Image
Make sure you sand all parts with 80 grit sand paper this will allow the metal glue to cure solid.
Image
Glue the inner plates together with the metal glue make sure the plates are perfectly aligned and clamp together with the c-clamps. Allow to cure for 24 hours you will use this same glue for all seams as you are assembling parts.
Metal Repair Glue
Image
After 24 Hours you want to sand and fill this area. This is why we did not want to glue it to the Master rear plate yet it makes it easier to get to this area.
Image

Step 1. Countersink the holes on the two main plates with the Diagram below and the two ladder plates as shown in the photo. Make sure you go slow for each hole testing periodically with the hex screw. Making sure the screw sites just under the surface. you will need to skim some of the screws with filler later to make them unseen.

90 Degree countersink bit
Image

Image

Image

Image

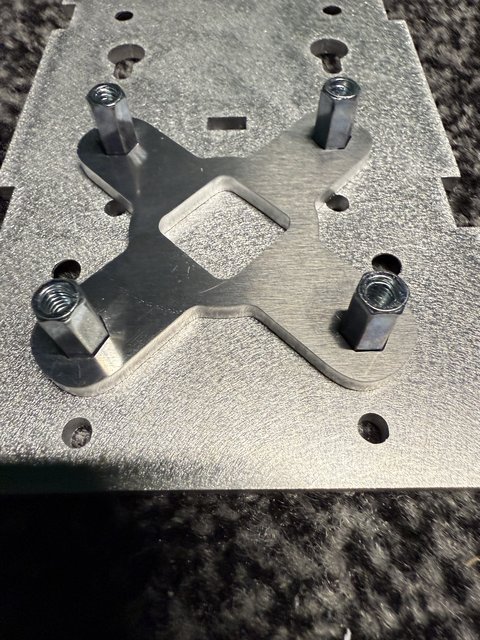
Step 2. with the M6 12mm small hex screws loosely fit all of the couplers on the lower plate once you have dry fit everything you will permanently attach the couplers to the lower plate with Loctite permanent thread lock. Using the stacked horseshoe make sure the couplers are in the correct position before you tighten all bolts

Loctite Thread lock
Image
Step 3. dry fit the ladder you may need to file some of the tabs a bit to get it to assemble once it fits well together using the glue and M6 12mm bolts and nuts assemble the ladder. Once again make sure the bolts rest below the surface you will skim these bolts later with filler and paint over them Loctite is a must here as well
Image
Image
Image
Step 4. At this point you can glue your ladder and stacked plates to the bottom Master plate use a rubber mallet to gently tap the pieces in place. Do not glue the top plate unless you are certain you do not need to run wire or make any adjustments.
Image
Step 5. Mount the shoulder hub mount make sure to adjust the Hight for the hub you plan on using. You may have to cut the tabs to use the bigger hole.
Image
Step 6. Finally bolt glue the top plate in place and Loctite the remaining M6 30mm screws after the glue cures for 24 hours you may prep your part for paint and fill all seams and bolts Most of the bolts will be hidden by greebles.
Image
Image Scavenger WorkshopImage
Locked