instructions to follow. i think these are all the current parts. rear door and utility arms are not included. as currently doing magnetic mounts. rear door supports are not included as doing magnetic mounts. these are all in 6mm thick parts for 3d print not for aluminium cutting as i was going to get it cut before i decided to semi retire. bread pans are not included until i work out a hinge mount. dome motor mount is done but i need to find the correct file.
Rough frame assembly guide. of course it will change with thicker material to how i did the OG version but thats why we test and test. thanks everyone.
here are the rear door files. no magnet holes yet so will wait for some advise on where to put them. the side of the door has about 6mm (0.25") for 2 3mm (0.125") magnets. i thinking 1 on the frame side 1 on the door. 1 magnet will need to be reversed so it will stick. thin washers can be used for padding it out. the x# at the end means how many times to print.
the breadpans... still need to make allowances for the hinges... i have designed a hinge extension but these give me feedback for if a tool can be placed inside
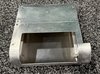
utility arm box.... this one is a doozie still. still thinking about how to mount... magnets or nut and bolt at the base... or both. only thinking magnets could pull out when some civilian yanks on the arms too much when shaking hands.... both will mean not all the weight will be on the bolt as magnets will give some resistance!! feed back welcome on everything!!